Monday, November 26, 2012

Atomos Ninja-2 on the Nikon D4


Using the Atomos Ninja-2 with the Nikon D4 (Now D4s and D810)

UPDATE: I now use the Ninja-2 with the D810 and the D4s. It works beautifully! There is no buzz on the HDMI Audio like there is on the Ninja blade and Shogun.

=Summary======================================================
Atomos Ninja-2 on Nikon
-Speeds up workflow significantly
-Focus Peaking works well
-Portable
-Starts/Stops recording as you enter and exit Live View, starting a new take for each cycle,  for easy control of recording.
=============================================================
Video on Youtube

Summary: Once set up all I have to do is start Live View (in video mode) and start the Ninja-2 recording. When I cycle the Live View button on the D4, the Ninja-2 starts recording when Live View is on and stops when I shut it off. Each time the Ninja-2 creates a new file for the next take. I turn on the Focus Peaking to ensure perfect focus and it stays on the whole time (does not reset when Live View is cycled). Perfection!

(C) Atomos 2012

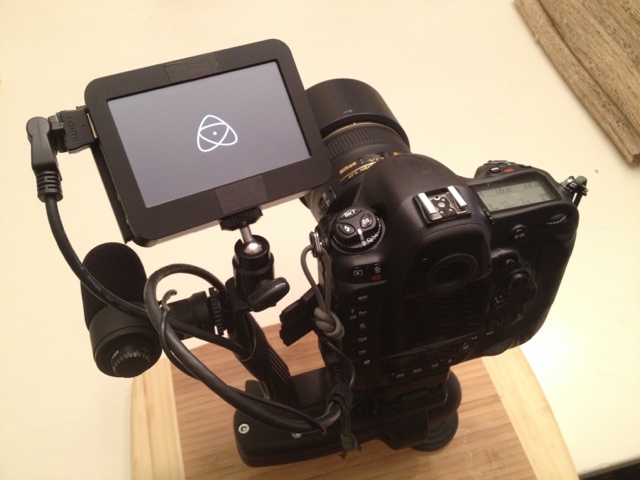
The Atomos Ninja-2 is a recent addition to my toolbag. It is a HDMI video recorder and monitor. It connects directly to the mini HDMI out on the Nikon D4. The feature that I really love, besides being a recorder is that with Focus Peaking, it doubles as a monitor.

The Rig:
The Rig  (ignore the parachute cord and the Manfrotto 322RC2 squeeze handle mount)
Parts:
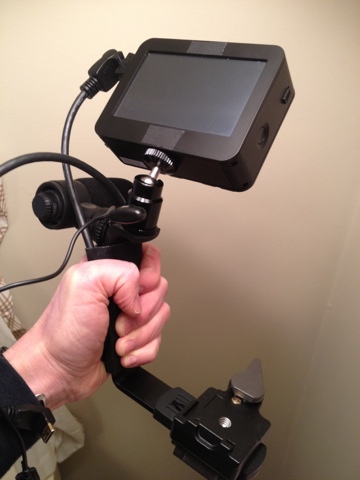
Vello CB-500 Dual Shoe Bracket - drilled and modified.
Manfrotto 323 RC2 with 200PL-14 Plate - and extra plate that was already on my camera. (See my previous post here)
1/4-20 bolt.


Putting it together:

First - Vello CB-500 Dual Shoe Bracket is not made to handle much weight. The hotshoe mounts will come right off. I removed the top hotshoe mount and drilled a hole to mount the Zylight Hot Shoe Ball Mount  through. The Zylight Hot Shoe Ball Mount  comes apart after removing a set screw and the bottom bolt can be removed and run through the hole drilled in the Vello CB-500 Dual Shoe Bracket. DO NOT USE THE HOTSHOT CONNECTOR ON THE TOP OF THE VELLO CB-500 TO HOLD ANY WEIGHT - IT WILL SNAP RIGHT OFF.

The Rig - basics without the Ninja-2 attached


I mounted the Atomos Ninja-2  on top of the Zylight Hot Shoe Ball Mount and the Nikon ME-1 Stereo Microphone on the side hotshoe mount. I then pulled apart one 200PL-14 and used a 1/4-20 bolt to connect the plate below to the Vello CB-500 Dual Shoe Bracket through to the base of the Manfrotto 323 RC2.
Manfrotto 323 RC2  - Vello CB-500 - 200PL-14 plate  Sandwich


This connection allows me to quickly connect the video rig to a tripod, and be able to quickly disconnect the camera from the video rig. (All I have to do is disconnect the HDMI and microphone connections and release the RC2.) This way I can shoot stills and attach the video rig all set up when I need to shoot video. When walking around on travel, it is very convenient to be able to pull gear out of a bag, use it and then put it away. Screwing and unscrewing multiple bolts is not very convenient for this. Also it is good to go with a proven clamp so you don't end up dropping thousands of dollars of gear. It will happen.

RC2 Quick release of D4 from Rig

D4 firmly attached to Rig (The handle clamp is the Manfrotto 322RC2 and is only there to hold the rig for the picture. It is not part of the rig.)


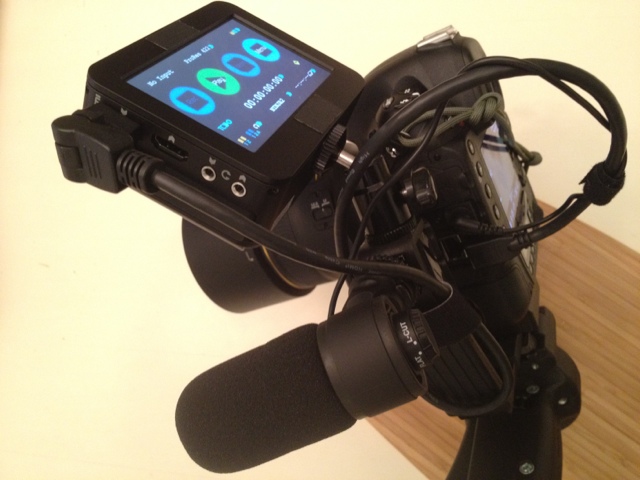
HDMI and Microphone connections


I connect the Zacuto 18" Right Angle Mini to Standard HDMI Cable from the Nikon D4 HDMI out to the HDMI in on the Atomos Ninja-2.

HDMI connection to Ninja-2


The Use:

I followed Thom Hogan's excellent post for setting up the Nikon D4 for the best video output.

I power up the Nikon D4 and the Atomos Ninja-2. I set the Video/Photo switch on the rear of the Nikon D4 to Video and press the Live View Button. I set the Atomos Ninja-2 to record and turn on the Focus Peaking. (To do this on the Ninja-2 press the yellow Mon button to start monitor mode, then the little camera shaped icon, then the man silouette icon. What is in focus will appear red on the monitor. Then I press the red circle in the bottom right to start recording.) I then press the Live View button on the D4 to shut off Live View. When I want to record, I just press the Live View button and the Atomos Ninja-2 starts recording a new take. When I press the Live View button again, the recording stops. In this way I can start and end each take with just the press of the Live View button on the rear of the D4 and there is no need to fiddle with anything else. (I noticed that the Ninja-2 recorded an additional file with less than a second of content on each cycle. I just discarded the extra files.)


Showing the Focus Peaking - See the Red in the eyes and on the mouth
This really is a good solution for me. Keep in mind that my background is in still photography and not video. I have done video editing with Adobe Premiere and Nuke in the past, but I have not been the primary shooter for video. I am sure that there are plenty of other solutions for video utilizing a professional HD video camera, but none of them will allow me to use the many Nikon lenses that I have acquired over the years. My objective was to have a video rig that was easy to attach and remove from my D4 so that I could quickly switch from still photo mode to broadcast quality video and back again.

The Atomos Ninja-2 does a lot of very good things for its price. The big plus for me are the Focus Peaking (Similar to what I use in Capture One Pro), recording trigger with the Nikon D4( Yes, there is really not technically a trigger, but it works just fine.), and the ability to use conventional hard drives and SSDs that can be hot swapped. There are also the Adjustable Zebra and False Color features for exposure, but I have not really utilized those yet. See the videos from Atomos here. I have used the Smartlog feature, but I find it quicker and easier to use Adobe Premiere to set my in and out points. With Adobe Premiere I can do my editing right on the Ninja-2 drive in the dock and output my compiled video. I use ProRes 422 and the new rolling shutter removal effect in Adobe Premiere CS6. The alternative of recording on the XQD or CF cards in the Nikon and then having to copy those files to a drive, uncompress the video to work with it, etc. is very time consuming and I would really alter what I consider to be an excellent workflow for me.


Check out:

Videos from Atomos here
Atomos Ninja-2 Review by Erik Vlientinck here
and

Cheesycam - Atomos Ninja-2 - There are some negative comments here. I wish only people who actually used a specific piece of gear wrote reviews and comments.

Rigs people use with it here - (you'll need to register for a login on this one.)
and here

Luminous Landscape did a review here. I like their review. What they say is true. They do mention the time required to copy and convert compressed video. The ability to just plug in the drive from the Ninja-2 into the drive deck that they provide and do your editing with Adobe Premiere right on the drive (without video conversion) is really the way to go for me. The alternative of copying and converting the compressed video from the 32GB XQD or compact flash card(s) to a drive for editing is very time consuming. The 750GB hard drive that I use with the Ninja-2 with no video conversion necessary makes the Ninja a great solution.

Another introduction by Larry Jordan here . He covers notes on using an external recorder as well.

Update:

I have substituted a Giottos MH-1104 mini ball head for the Zylight and put the ME-1 Microphone on top of the Ninja-2 with a Wooden Camera mount. This allows me to quickly disconnect the rig and shove it into my bag. (I have an older version Crumpler with velcro - I think that it is close to the current 7 Million dollar home.) Yes, the Wooden camera mount is a bit pricey, but is is the most compact and durable cold shoe that I could find that mounts right on top of the Ninja-2. Due to the request put up a quick video for it on Youtube

Update:
I have substituted the Manfrotto 492LCD Micro Ball Head  for the Giottos MH-1104.  The Manfrotto is way more sturdy (and heavier) and it really locks the monitor in place. I also use the Rode Video Mic Pro instead of the ME-1. Now I really use the Nagra SD recorder as well! That thing is just awesome!

Here are some additional pics. (Added some high res and retakes on request)


Atomos Ninja-2 Rig without Camera
Atomos Ninja-2 Rig with Nikon D4
Atomos Ninja-2 Rig - High Res

Atomos Ninja-2 with Nikon D4 Video Rig - High Res


Update:
=====================================================================
Newer Rig with
Vello Triple Shoe
Manfrotto 492 LCD ball head
Nagra SD
with the D4s and the D810


Oh - and Yes I still use the Rode Video Mic Pro on occasion when I want to cut out a lot of ambient sound.


With the Nikon D4 I welcome back my 85 f/1.4g and 24 f/1.4

With the Nikon D4 I welcome back my Nikon 85mm f/1.4g and Nikon 24mm f/1.4g

In a previous post on Nikon 24-70 and 70-200 I mentioned that my D3 with an Nikon 85mm f/1.4 or 24 f/1.4 did not focus fast enough for photos of fast action or especially of toddlers.

Well the D4 focuses so well and so fast that the Nikon 85 f/1.4 and Nikon 24 f/1.4 are back in the game. These are great lenses for portraits with excellent color rendition and capable of exquisite looks that few other lenses can duplicate. (You can always pick up a Nikon 200mm f/2.0.) The 85mm is faster at focusing than the 24mm, but that is ok. The 200mm focuses faster than the 70-200mm f/2.8 so that was never an issue.

Also of mention - the Nikon D4 produces the highest number of straight to JPEG shots from any camera that I have used. I usually have to spend at least a few seconds to tweak the RAW files before printing to get what I would call usable photos from any previous camera I used. It is like having my old Nikon F5 back in my hands again! I still shoot RAW and JPEG, but I have found that all I have to do now is adjust the crop in Photo Mechanic and print. (Photo Mechanic is used by many Sports Photographers to quickly import, sort and update IPTC data. It is incredibly fast.)

Ok - Update - The D4s - absolutely blows away the D4 for focusing - hands down! It is faster and more accurate - as if that is even possible.

Tuesday, November 20, 2012

Nikon D4 Wireless Tethering

People have asked me about linking the new Nikon D4 wirelessly without resorting to the Nikon WT-5a, due to its high cost. (Note: The Nikon WT-5a has dropped in price to around $600.)

What I use is the Netgear WNCE2001


The Netgear WNCE2001 is easy to set up, following the standard directions. (utilizing the HTTP plugin configuration and not the push a button autosetup. Basically you shut off your computer's wireless card and then plug in the Netgear WNCE2001 with an ethernet cable. Then you start any browser and you are sent immediately to the Netgear WNCE2001 configuration. It is just like logging onto your network as you would with your wireless card. Once it logs onto your network, it will remember the settings and use those settings when you plug it into your Nikon D4. (Note: I use the standard network setup through a router and not ad-hoc. I have had too many problems with disconnections while using ad-hoc mode to make it worth using.)

To power the Netgear WNCE2001 I use a Mophie Powerstation Gen 2, which works flawlessly.


I just plug the Netgear WNCE2001  into the ethernet port on the Nikon D4. I then plug the Netgear WNCE2001  into the Mophie Powerstation Gen 2 and push the button on the side to power it up. It works just like I have and ethernet cable directly connected. The speed is somewhat slower than with the ethernet cable connected, but it is very usable for photos.

What software do I use?
Well my favorite is Capture One Pro 7 you can check out my earlier post here. Capture One Pro 7 is updated and controls the Nikon D4 wirelessly, with ethernet, or USB. I also use Camera Control Pro from Nikon. (I did install the Wireless Transmitter Utility from Nikon, which is covered in the Nikon D4 manual. there is also a decent tutorial here) Capture One Pro 7 allows me to control the camera from either inside of Capture One Pro 7 or from the camera. This is much better than other applications which take over the camera and do not allow me to shoot as I normally would with camera in hand. It can be very frustrating to miss the perfect shot because you can't just take it because you have to run over to the computer to get the camera to fire.

Another piece of software that I use is onOne's DLSR Camera Remote Pro. This allows me to control the camera from an iPhone or with onOne's DLSR Camera Remote HD and iPad. The Ipad interface is the more usable of the two. It allows me to have Liveview video or still photos streaming to the iPad. I can see what the camera is seeing, focus, adjust settings and shoot or record - all from the iPad. It works really well for family portraits when the photographer has to be in the photo. One example view is shown at the bottom of the page here.

While the setup with Netgear WNCE2001 and Mophie Powerstation Gen 2 are much larger than the Nikon WT-5a, they are also much cheaper and can be used on any ethernet ready device. I may try the Nikon WT-5a sometime in the future when it drops in price to a more reasonable $300 or so.

(Another option is the D-Link DAP-1350)


Friday, September 21, 2012

How to Shoot Kitchen Cabinets and Furniture

I had the opportunity to shoot a few photos for Harvey Miller, a Washington DC area Master Craftsman. Harvey started out restoring 17-19th Century furniture over 30 years ago and continues to do great work on refinishing kitchen cabinets as well.

Always eager to try something new, I took a drive up to Frederick, MD to shoot some of the kitchens he has refinished.


The first thing I shot was an example of Harvey's restoration of this beat up cabinet door. The right side of the door shows the original condition and the left side is refinished. The picture was taken in the shade provided by Harvey's van (pictured above.) I laid out a piece of old black velvet curtain and set the piece on top of it. The main light came from a softbox set on the ground to the left of the piece. The second light was from the flash on top of the camera. The lens was a standard Nikon 70-200 f/2.8 VR II.


Alright - on to the kitchen. (This kitchen was refinished over a year before these pictures were taken so the cabinets show the wear and tear and smudges from a year of cooking, etc.)

The first thing we did when we got to the house was meet the owners and thank them for giving us the opportunity to come into their home and take some shots of their kitchen. We left all of the camera gear in the car at first. There is no need to bring in all of your tools, when only a few will get the job done. There is also no need to try to impress the homeowners by invading their home with piles of gear. After taking a look around we decided to use one umbrella with a Nikon SB900, one Bruce Dorn Softbox with eggcrate diffuser (Watch for sales on eggcrate diffusers. Full price they are very expensive. I got mine on sale for around $29 each.) and one flash on the camera. The lens was a Nikon 24 f/1.4 G.

In this shot the umbrella was off to the right behind the camera and set 1 stop less than the main flash on the camera which was bounced off of the ceiling. The umbrella served to fill the room with diffuse light from below and behind similar to the clamshell lighting technique that is used in portraiture. Given more time it might have been better to set up a longer exposure and a tripod to allow for less light and help to subdue the large white highlight on the cabinet center from both the ceiling bounce and umbrella.


This shot was meant to put emphasis on how the stain brought out the wood pattern on the left door, while also showing the type of satin finish on doors as seen on the two right doors. This was done with the Bruce Dorn softbox with eggcrate diffuser. This setup can also make the light look as though it is coming through a window to the left of the cabinets as well as a second north facing window further to the left and behind the camera. Since this was not the layout of the actual kitchen the softbox makes a good substitute to give that same look.


This final shot makes use of the softbox to the left of the camera facing across the surface of the cabinet to bring out the detail in the hardware and the clean finish along the grooves in the wood. The fill light was from the flash on top of the camera.

As always with these shots, I used the RadioPopper PX system. It works tremendously well, allowing me to use the full Nikon CLS system as intended, even when my flashes are not in line of sight. In this case I could have done this without the radio transmission and used the SB900's as intended, but I had the setup prepped with RadioPoppers in case I needed to move the flash outside and fire it through a window.

Notes for Shooting Kitchens:

1) Watch the little details. Any smudges and out of place objects will draw the viewers eyes away from the intended subject detail.

2) Get the camera and lens as close to perfectly vertical as possible. This will help to avoid distortion. If you do get some distortion the lens correction filter in Photoshop can help you out.

3) Lighting, Lighting, Lighting - Shooting in kitchens is all about lighting. You need enough to light the room for the wide shot as well as lights for emphasis in the closer shots. This does not mean that the room needs to be blown away with light, just enough will do. Without the light, it is hard to bring out the detail of the finish or the wood grain on the cabinets.

4) Depth of Field. A smaller F stop around f/11 to f/16 will ensure that all of the objects are in sharp focus. While tight focus with a falloff is good for specific objects, it can be distracting when looking for detailed craftsmanship across the kitchen. Artistic views are good, but the emphasis here is on letting the viewer zoom in and look at the details that they want. The intention is to bring out those details, but not dictate exactly where they look. The viewer should be able to inspect the piece as though they were there up close and able to touch it with their own hands.

Notes on Flashes:

I always try to have twice the number of flashes that I need. When you shoot portable flashes and you try to squeeze all of the light out of them you can get (when trying to overpower ambient light or using high speed sync (HSS)) you will quickly either exceed your flashes ability to deliver enough light (HSS) or overheat the flashes. If you use two or three flashes in the place of one they can all be set on a lower power and will not overheat as quickly. Always have a spare master flash to place on the camera if you are using that as well for bounce lighting. Sometimes that means two flashes per umbrella and three umbrellas and others it is three flashes per umbrella and only two umbrellas. The Lastolite Triflash brackets work well.