Using the Atomos Ninja-2 with the Nikon D4 (Now D4s and D810)
UPDATE: I now use the Ninja-2 with the D810 and the D4s. It works beautifully! There is no buzz on the HDMI Audio like there is on the Ninja blade and Shogun.
=Summary======================================================
Atomos Ninja-2 on Nikon
-Speeds up workflow significantly
-Focus Peaking works well
-Portable
-Starts/Stops recording as you enter and exit Live View, starting a new take for each cycle, for easy control of recording.
=============================================================
Video on Youtube
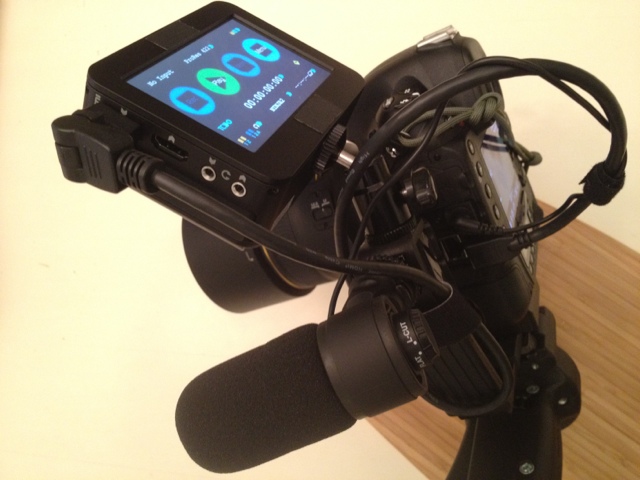
Summary: Once set up all I have to do is start Live View (in video mode) and start the Ninja-2 recording. When I cycle the Live View button on the D4, the Ninja-2 starts recording when Live View is on and stops when I shut it off. Each time the Ninja-2 creates a new file for the next take. I turn on the Focus Peaking to ensure perfect focus and it stays on the whole time (does not reset when Live View is cycled). Perfection!
 |
| (C) Atomos 2012 |
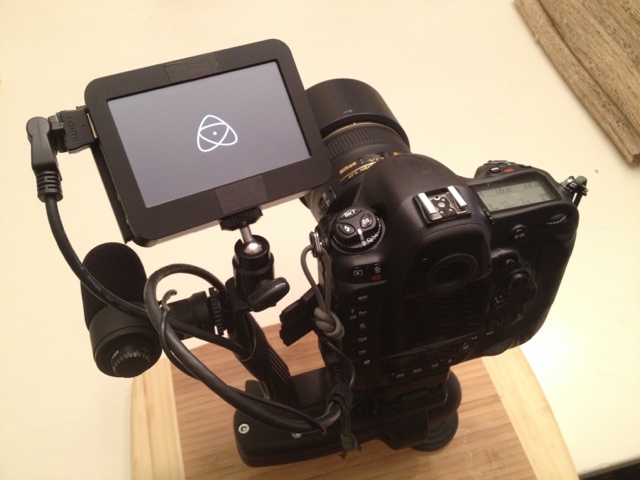
The Atomos Ninja-2 is a recent addition to my toolbag. It is a HDMI video recorder and monitor. It connects directly to the mini HDMI out on the Nikon D4. The feature that I really love, besides being a recorder is that with Focus Peaking, it doubles as a monitor.
The Rig:
 |
| The Rig (ignore the parachute cord and the Manfrotto 322RC2 squeeze handle mount) |
Parts:
Vello CB-500 Dual Shoe Bracket - drilled and modified.
Manfrotto 323 RC2 with 200PL-14 Plate - and extra plate that was already on my camera. (See my previous post here)
1/4-20 bolt.
Putting it together:
First - Vello CB-500 Dual Shoe Bracket is not made to handle much weight. The hotshoe mounts will come right off. I removed the top hotshoe mount and drilled a hole to mount the Zylight Hot Shoe Ball Mount through. The Zylight Hot Shoe Ball Mount comes apart after removing a set screw and the bottom bolt can be removed and run through the hole drilled in the Vello CB-500 Dual Shoe Bracket. DO NOT USE THE HOTSHOT CONNECTOR ON THE TOP OF THE VELLO CB-500 TO HOLD ANY WEIGHT - IT WILL SNAP RIGHT OFF.
 |
| The Rig - basics without the Ninja-2 attached |


I mounted the Atomos Ninja-2 on top of the Zylight Hot Shoe Ball Mount and the Nikon ME-1 Stereo Microphone on the side hotshoe mount. I then pulled apart one 200PL-14 and used a 1/4-20 bolt to connect the plate below to the Vello CB-500 Dual Shoe Bracket through to the base of the Manfrotto 323 RC2.


 |
| Manfrotto 323 RC2 - Vello CB-500 - 200PL-14 plate Sandwich |
This connection allows me to quickly connect the video rig to a tripod, and be able to quickly disconnect the camera from the video rig. (All I have to do is disconnect the HDMI and microphone connections and release the RC2.) This way I can shoot stills and attach the video rig all set up when I need to shoot video. When walking around on travel, it is very convenient to be able to pull gear out of a bag, use it and then put it away. Screwing and unscrewing multiple bolts is not very convenient for this. Also it is good to go with a proven clamp so you don't end up dropping thousands of dollars of gear. It will happen.
 |
RC2 Quick release of D4 from Rig
|
 |
| D4 firmly attached to Rig (The handle clamp is the Manfrotto 322RC2 and is only there to hold the rig for the picture. It is not part of the rig.) |

 |
| HDMI and Microphone connections |
I connect the Zacuto 18" Right Angle Mini to Standard HDMI Cable from the Nikon D4 HDMI out to the HDMI in on the Atomos Ninja-2.
 |
HDMI connection to Ninja-2
|
The Use:
I followed Thom Hogan's excellent post for setting up the Nikon D4 for the best video output.
I power up the Nikon D4 and the Atomos Ninja-2. I set the Video/Photo switch on the rear of the Nikon D4 to Video and press the Live View Button. I set the Atomos Ninja-2 to record and turn on the Focus Peaking. (To do this on the Ninja-2 press the yellow Mon button to start monitor mode, then the little camera shaped icon, then the man silouette icon. What is in focus will appear red on the monitor. Then I press the red circle in the bottom right to start recording.) I then press the Live View button on the D4 to shut off Live View. When I want to record, I just press the Live View button and the Atomos Ninja-2 starts recording a new take. When I press the Live View button again, the recording stops. In this way I can start and end each take with just the press of the Live View button on the rear of the D4 and there is no need to fiddle with anything else. (I noticed that the Ninja-2 recorded an additional file with less than a second of content on each cycle. I just discarded the extra files.)

 |
| Showing the Focus Peaking - See the Red in the eyes and on the mouth |
This really is a good solution for me. Keep in mind that my background is in still photography and not video. I have done video editing with Adobe Premiere and Nuke in the past, but I have not been the primary shooter for video. I am sure that there are plenty of other solutions for video utilizing a professional HD video camera, but none of them will allow me to use the many Nikon lenses that I have acquired over the years. My objective was to have a video rig that was easy to attach and remove from my D4 so that I could quickly switch from still photo mode to broadcast quality video and back again.
The Atomos Ninja-2 does a lot of very good things for its price. The big plus for me are the Focus Peaking (Similar to what I use in Capture One Pro), recording trigger with the Nikon D4( Yes, there is really not technically a trigger, but it works just fine.), and the ability to use conventional hard drives and SSDs that can be hot swapped. There are also the Adjustable Zebra and False Color features for exposure, but I have not really utilized those yet. See the videos from Atomos here. I have used the Smartlog feature, but I find it quicker and easier to use Adobe Premiere to set my in and out points. With Adobe Premiere I can do my editing right on the Ninja-2 drive in the dock and output my compiled video. I use ProRes 422 and the new rolling shutter removal effect in Adobe Premiere CS6. The alternative of recording on the XQD or CF cards in the Nikon and then having to copy those files to a drive, uncompress the video to work with it, etc. is very time consuming and I would really alter what I consider to be an excellent workflow for me.
Check out:
Videos from Atomos here
Atomos Ninja-2 Review by Erik Vlientinck here
and
Cheesycam - Atomos Ninja-2 - There are some negative comments here. I wish only people who actually used a specific piece of gear wrote reviews and comments.
Rigs people use with it here - (you'll need to register for a login on this one.)
and here
Luminous Landscape did a review here. I like their review. What they say is true. They do mention the time required to copy and convert compressed video. The ability to just plug in the drive from the Ninja-2 into the drive deck that they provide and do your editing with Adobe Premiere right on the drive (without video conversion) is really the way to go for me. The alternative of copying and converting the compressed video from the 32GB XQD or compact flash card(s) to a drive for editing is very time consuming. The 750GB hard drive that I use with the Ninja-2 with no video conversion necessary makes the Ninja a great solution.
Another introduction by Larry Jordan here . He covers notes on using an external recorder as well.
Update:
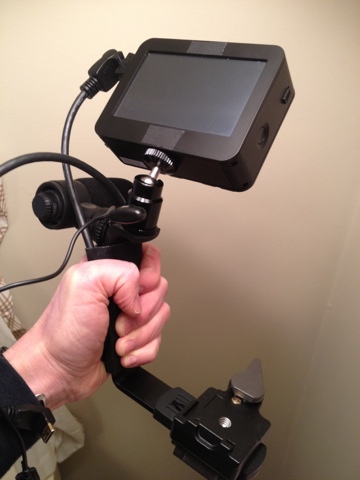
I have substituted a Giottos MH-1104 mini ball head for the Zylight and put the ME-1 Microphone on top of the Ninja-2 with a Wooden Camera mount. This allows me to quickly disconnect the rig and shove it into my bag. (I have an older version Crumpler with velcro - I think that it is close to the current 7 Million dollar home.) Yes, the Wooden camera mount is a bit pricey, but is is the most compact and durable cold shoe that I could find that mounts right on top of the Ninja-2. Due to the request put up a quick video for it on Youtube
Update:
I have substituted the Manfrotto 492LCD Micro Ball Head for the Giottos MH-1104. The Manfrotto is way more sturdy (and heavier) and it really locks the monitor in place. I also use the Rode Video Mic Pro instead of the ME-1. Now I really use the Nagra SD recorder as well! That thing is just awesome!
Here are some additional pics. (Added some high res and retakes on request)
 |
| Atomos Ninja-2 Rig without Camera |
 |
| Atomos Ninja-2 Rig without Camera |
 |
| Atomos Ninja-2 Rig with Nikon D4 |
 |
| Atomos Ninja-2 Rig - High Res |
 |
| Atomos Ninja-2 with Nikon D4 Video Rig - High Res |


Update:
=====================================================================
Newer Rig with
Vello Triple Shoe
Manfrotto 492 LCD ball head
Nagra SD
with the D4s and the D810


Oh - and Yes I still use the Rode Video Mic Pro on occasion when I want to cut out a lot of ambient sound.
You mention copying of files from a CF card to your computer being slow. Yes, but not if you are using a Lexar CF/SD reader with an Ultra DMA (UDMA) interface to your computer's USB port.
ReplyDeleteHow about mentioning prices you paid?
Terry Thomas
DP
Atlanta
Terry,
ReplyDeleteThank you for taking the time to post and tell us your experience with the Lexar card reader. I agree this reader is very fast for transferring Megabyte sized picture files. It is slower when the files are Gigabyte sized as video files can be. In my workflow I often process the video files on the original drive, saving me the step of copying them entirely, and when I am finished I back them up to archive them. Since a lot gets cut I sometimes only save the final cuts. When the job requires an immediate backup, I copy the files using the SATA interface in a drive deck which is significantly faster than USB transfer speeds.
About prices: I am not a vendor selling items. I would list the prices of items that I had for sale. I do provide links to the vendors to make it more convenient for readers to look up the item, its full description, and the current sale price.
Thanks again.
Dan
This comment has been removed by a blog administrator.
ReplyDeleteThis comment has been removed by the author.
ReplyDeleteJapie wrote asking "What is your opinion of the difference in quality between the internal vs Ninja recording? I am specifically referring to the comments on the web about how "soft" the internal recording is vs the 2.7 crop.
ReplyDelete"
Japie,
I have not tested the difference in quality between the internal and Ninja-2 recording. I have read the comments on the web as well. What I can say is that recording with the Ninja-2 is far more convenient for shooting and editing. The ability to use a focus mask and eliminating the need to copy video files from XQD of Compact flash cards does wonders for my workflow. Shots are easily in focus and the accessing the video is much faster for editing and backup. (It really does take a while to copy large files from any of the external cards.)
It may be convenient to record directly on the camera, but you will need an additional microphone to avoid hearing any of your own finger shuffling, autofocus sounds and just to get a better quality recording.
I have used to 1.5 and 2.7 crop settings with the Ninja-2 to use my 70-200 for sports and I have gotten some great quality video. Again, the focus mask made all the difference when trying to keep the players and the ball framed and in focus. (position, zoom, manual focus, etc.)
At some point I will test the quality of the internal recording, but for now I will stick with my work flow and the Ninja-2. Video is just so different from still photography in so many ways (camera autofocus being one of them) and I have found may references to focus issues and softness turn out to be issues of lens and camera use and can be overly critical. For instance, I shoot my 24/1.4, 85/1.4 and 200/2.0 wide open (or 2.2 on the 200). At these settings, the primary focus is sharp and everything else is incredibly soft. Many of the tests of these lenses are conducted at f8, which I almost never use with these lenses. There is just a different aesthetic look to the whole picture on these lenses between wide open and f8. This includes focus, softness, color rendition, (I hate to say bokeh), and so many other aspects.
My advice is: If a specific setup, method, camera and lens system is critical for you; rent the equipment for several days and conduct your own tests. Online opinion, while it may serve as a guide, is no substitute for your own critical tests and experience.
Sorry that I have not run the specific tests, but I hope that you find this helpful.
Dan
Ah - What I forgot to say in the previos answer was that in 2.7x or 1.5x crop mode only the center of the lens is being used. Since lenses are usually sharper at their centers, the 2.7x crop may appear sharper than the full sensor mode, just based on the lens glass utilized in front of it.
ReplyDelete- and typing with one hand while eating means that one tends to miss the keys on the right side of the keyboard. (previous)
ReplyDeletehi there,
ReplyDeletefantastic post/blog, thank you. I just wondered if from your experinece taking footage in via the atomos 2 results in sharper/better image quality than if you record to the CF card?
The D4 in full frame mode into 1920x1080 has blurred results unless you apply the sharpening to around +4. Does the atomos get around this at all?
Would be great to know, have read mixed things but nothing concrete.
Thank you!
In response to J Stephens:
DeleteMost of the video that I shoot is not directly to the XQD or CF card. The video directly to the cards end up compressed and more lossy in general and using the ninja-2 has been better for my workflow.
I shoot almost everything without sharpening and then do the sharpening in Premiere when I have chosen the output medium and aspect ratio that I am going to.
What I have found is that sharpening at the end(as it is with stills as well) I can get better color and contrast without the added artifacts that early sharpening can give me.
I hope that this helps.
Thank you for the helpful, well-written article.
ReplyDeleteGreat Post! Very imformative and helpful. thanks Dan!
ReplyDeleteThis comment has been removed by the author.
ReplyDeleteHi there, I found this very neat and it appealed to my DIY/modding side. There are some useful take-away ideas here for me.
ReplyDeleteThanks for sharing this.
All the best,
Paul
I really appreciate the post and review to tell us your best experience using the Atomos. I wish I can have one of that by the end of the month.
ReplyDeleteNinja Blade External Recorder
Thanks for this blog post and info. It really helps! I just ordered a D4S and Ninja Blade and am looking forward to doing some testing myself along with comparisons with the D800. Nice to hear how the Ninja and D4 interact with LiveView.
ReplyDeleteI just would know if you are able to record 720p 60fps with your atomos ninja2 from the nikon D4. Seems like this information is unfoundable on web!
ReplyDeleteThanks a lot!
I just tested this with the Nikon D4S and the Ninja Blade and yes you can record 720p video at 59.97 fps.
DeleteI honestly haven't tried. I used it for 1080p 24fps. I did pick up the Shogun that definitely does the 60fps. That question is probably best for Atomos to answer. I no longer have the D4 and I am planning on selling the ninja-2 now that I have upgraded to a Shogun. The Ninja-2 is a wonderful piece of gear.
ReplyDeleteCorrection: I am not selling the Ninja-2. It has a great HDMI front end and works great. As long as I am recording 1080p, I will hang onto it.
ReplyDelete